Whether or not the “Post-Quantum Encryptogeddon” is actually coming, it might be good to boost your defenses. Here is how.

Imagine waking up tomorrow, and reading in the news that someone has managed to build a quantum computer with enough qubit to destroy modern public-key cryptography (RSA, ECDH, DSA, ECDSA, …). You would think that cryptography is dead, and that you and your data are no longer safe.
Let me reassure you: for the time being, you are not in danger. On one hand, quantum computers are still far from being capable of such actions; on the other, many cryptographers all over the globe are busy developing software resistant to quantum attacks – including us at dyne.org!

The National Institute of Science and Technology (NIST) has been leading an effort to define cryptographic standards for new asymmetric encryption algorithms and digital signatures, capable of withstanding foreseeable attacks made with quantum computers.

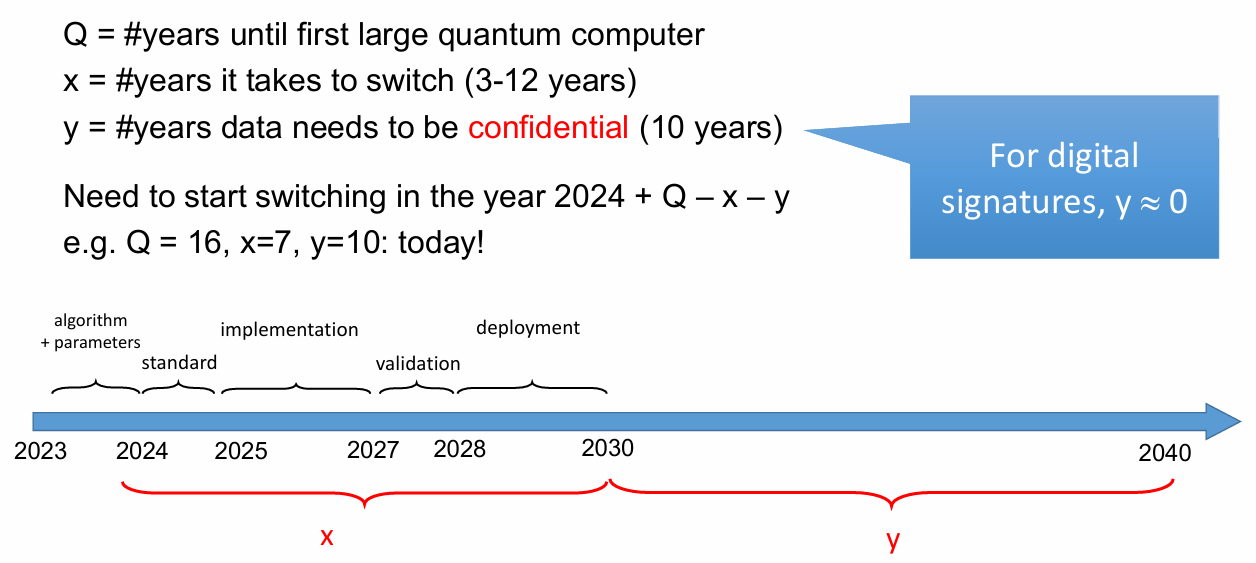
Nevertheless, there is still a major real threat: the so-called “capture now, decrypt later” attack. An attacker could steal your encrypted data today, and manage to decrypt it later with the powerful tools that might be available in the future.

It is best to start using Quantum-Proof Cryptography as soon as possible! And of course, our crypto software “Zenroom” already does this.

Zenroom is a tiny secure execution environment that can be integrated into any platform and application, even on a chip or a web page. It can authenticate, authorize access and execute human-readable smart contracts for blockchains, databases and much more.
Zenroom’s version 3 is including quantum-proof cryptography from its inception.
Using Zenroom, you can easily create programs that use quantum proof signatures just like any other signature scheme that is already supported and well documented.
Keep reading this article for a step-by-step guide. In the following examples, we are going to use Zenroom’s on-line playground Apiroom.net. Don’t worry: you can easily try it in your browser, no installation required! Refer to this documentation for a quick introduction to Apiroom.
Now let’s dive into Zenroom’s Quantum-Proof features!
Signature
In the cryptographic world, signatures play a fundamental role to ensure the origin and authenticity of a message. The current standardized signature algorithm, that can be used also in Zenroom, is ECDSA, but this algorithm is not Quantum-Proof! To overcome this issue, the Dilithium2 signature algorithm has been implemented in Zenroom. It is a lattice-based digital signature scheme, whose security is based on the hardness of finding short vectors in lattices.

How can we use it, you might ask? It’s easier than you think, and you can do it by following the steps below. In a heartbeat, you will have signed your message!
Create a private key
As first step, you have to create your own personal Dilithium private key. To do that, once you have opened the Apiroom.net website, click on the ‘Examples’ button in the top left corner, and scroll down until you see ‘QP Dilithium generate key’.
The last thing that you need to do is to press ‘Run’ in the top right corner, and you will have generated your Dilithium private key, which will be printed on the right side of your screen in base64 format.
The code is:
Scenario ‘qp’ : Create the dilithium private key
Given I am ‘Alice’
When I create the dilithium key
Then print my ‘keyring’- In the given phase you declare who you are, so feel free to substitute “Alice” with your name, but make sure to remember it for later.
- In the when phase, you compute the Dilithium private key that is saved in your keyring.
- In the then phase you simply print your keyring.
Generate the public key
The public key can always be created by starting from the secret key, so we can generate it on the fly every time we need it instead of storing it. To generate the dilithium public key click on the ‘Examples’ button, then on ‘QP Dilithium generate public key’ and finally on ‘Run’.
If you want to use the Dilithium private key that you have generated in the previous step, you can simply copy the output of the previous code and paste it in the ‘Keys’ section, substituting what is present there.
The code is:
Scenario ‘qp’: create the dilithium public key
Given I am ‘Alice’
Given I have my ‘keyring’
When I create the dilithium public key
Then print my ‘dilithium public key’- In the Given phase, firstly state who you are and secondly upload your Keyring. If you are using your keyring, change “Alice” with the name used in the previous script.
- In the When phase the dilithium public key is computed.
- In the Then phase the dilithium public key is printed.
Sign a message
To sign a message you will need two things: the message to be signed and your secret key. The message can be of any kind, like a simple string, an array or a dictionary. To sign, click on the ‘Examples’ button, then on ‘QP Dilithium create signature’ and finally on ‘Run’.
If you want to use the Dilithium private key that you have generated in the first step then, as before, you can substitute the keyring in the ‘Keys’ section with your keyring. The message that will be signed is the one present in the ‘Data’ section, so feel free to modify it.
The code is:
Scenario ‘qp’: Alice signs the message
Given I am ‘Alice’
Given I have my ‘keyring’
Given I have a ‘string’ named ‘message’
When I create the dilithium signature of ‘message’
Then print the ‘dilithium signature’
Then print the ‘message’- In the given phase you state who you are, then upload your keyring and finally upload the message to be signed. If you are using your keyring, change “Alice” with the name used in the first script.
- In the when phase the dilithium signautre of the message is computed.
- In the then phase the dilithium signature and the message are printed.
Now we can send the dilithium public key (generated in the previous step), the dilithium signature and the message to the receiver, and he or she will be able to verify the authenticity of the message.
Since the public key can be always created starting from the private key, instead of computing and storing it, you can compute the dilithium public key along with the dilithium signature and send all the output to the receiver, storing nothing more than the dilithium private key.
The code will be as follows:
Scenario ‘qp’: Alice signs the message
Given I am ‘Alice’
Given I have my ‘keyring’
Given I have a ‘string’ named ‘message’
When I create the dilithium signature of ‘message’
When I create the dilithium public key
Then print the ‘dilithium signature’
Then print the ‘message’
Then print my ‘dilithium public key’
The output of this code contains all that the receiver will need to verify the authenticity of the message.
Verify the signature
The last step is to verify the message’s dilithium signature. You will need three things: the message, the dilithium signature and the signer dilithium public key. To verify a signature click on the ‘Examples’ button, then on ‘QP Dilithium verify signature’ and finally on ‘Run’.
If you have created your dilithium public key, message and dilithium signature and you want to verify it, then you can simply remove everything that is present in the ‘Keys’ and ‘Data’ sections and then copy and paste the output of the modified signature code in the ‘Data’ section.
The code is:
Scenario ‘qp’ : Bob verifies Alice signature
Given I have a ‘dilithium public key’ from ‘Alice’
Given I have a ‘string’ named ‘message’
Given I have a ‘dilithium signature’
When I verify the ‘message’ has a dilithium signature in ‘dilithium signature’ by ‘Alice’
When I write string ‘Verification of Dilithium signature succeded!’ in ‘verification’
Then print the ‘verification’- In the Given phase you upload the signer’s dilithum public key, the message and the dilithium signature. If you have changed “Alice” with your name in the previous steps, then do the same here.
- In the When phase Alice’s dilithium signature of the message is verified. If you are using a different name, substitute “Alice” with the name you are using here as well.
- In the Then phase, if the verification succeeded, the string “Verification_of_Dilithium_signature_succeeded!” will be printed.
Key encapsulation mechanism
Key Encapsulation Mechanisms (KEM) are used to secure the exchange of symmetric key using Public-Key Algorithms. In Zenroom there is the possibility to choose between two different types of Quantum-Proof KEM algorithms: Kyber512 and Streamlined NTRU Prime 761.

Kyber is a lattice-based KEM whose security is based on the hardness of solving the learning-with-errors (LWE) problem over module lattices.

Streamlined NTRU Prime security is based on the NTRU Key Recovery problem. Moreover, the last version of OpenSSH (9.0) uses the hybrid Streamlined NTRU Prime + x25519 key exchange method by default.
The following zencode examples will use Kyber, but if you want to try using Streamlined NTRU Prime then this can be simply done by changing the term kyber with ntrup.
Create the private and public key
This is equivalent to Dilithium. On the Apiroom.net website, click on the ‘Examples’ button in the top left corner, then on ‘QP Kyber generate key’ or ‘QP Kyber generate public key’ to create respectively the private and the public key.
Private key:
Scenario ‘qp’ : Create the kyber private key
Given I am ‘Alice’
When I create the kyber key
Then print my ‘keyring’
Public key:
Scenario ‘qp’ : Create and publish the kyber public key
Given I am ‘Alice’
Given I have my ‘keyring’
When I create the kyber public key
Then print my ‘kyber public key’
Create the KEM
Now, anyone who has access to your kyber public key can create a shared secret and the corresponding ciphertext for you. To create this pair, simply click on the ‘Examples’ button, then on ‘QP Kyber create kem’ and finally on ‘Run’.
The code is:
Scenario ‘qp’ : Bob create the kyber kem for Alice
Given I have a ‘kyber public key’ from ‘Alice’
When I create the kyber kem for ‘Alice’
Then print the ‘kyber secret’ from ‘kyber kem’
Then print the ‘kyber ciphertext’ from ‘kyber kem’- In the given phase you upload Alice’s kyber public key.
- In the when phase the Kyber pair {Shared-Secret, Ciphertext} is computed and saved under the names kyber secret and kyber ciphertext and grouped inside a dictionary named kyber kem.
- In the then phase the kyber secret and the kyber ciphertext are printed.
The kyber secret is the symmetric key that will be use later to exchange information encrypted with some symmetric cipher. Thus you have to keep it secret, and send over the channel only the kyber ciphertext. Alice will need nothing more to retrieve the kyber secret.
Retrieve the secret
The last step is to retrieve the kyber secret from the kyber ciphertext; in this case, Alice will also receive the kyber secret. We are doing this only to compare it with the secret that was recreated and show that the two objects match. This will not happen in real life applications. To recreate the kyber secret, click on the ‘Examples’ button, then on ‘QP Kyber recreate secret from ciphertext’ and finally on ‘Run’.
The code is:
Scenario ‘qp’ : Alice create the kyber secret
Given that I am known as ‘Alice’
Given that I have my ‘keyring’
Given I have a ‘kyber ciphertext’
Given I have a ‘base64’ named ‘kyber secret from Bob’
When I create the kyber secret from ‘kyber ciphertext’
When I verify ‘kyber secret from Bob’ is equal to ‘kyber secret’
When I write string ‘Verification of kyber cyphertext succeded!’ in ‘verification’
Then print ‘verification’
Then print ‘kyber secret’- In the given phase, declare who you are, upload your keyring, the kyber ciphertext and the kyber secret computed by Bob in the previous step.
- In the when phase the kyber secret is retrieved from the kyber ciphertext and a check is performed to see if it matches the secret computed by Bob.
- In the then phase the kyber secret is printed.
Benchmarks
So far we have talked about the security of these cryptographic primitives, but security never comes without a cost. As you have seen before, the first downside is the length of the keys, signatures and ciphertexts.

Dilithium2 generates a 2420 bytes signature and, in order to encapsulate a 32 bytes secret Kyber512 and Streamlined NTRU Prime 761, creates a ciphertext of 768 and 1039 bytes respectively.
Now we will investigate the time and memory consumed by each of these Quantum-Proof algorithms, and compare them to ECDSA/ECDH. The results you will see are obtained running the tests that you can find here for the signature scheme and here for the KEM schemes.
Signature
The signature is composed of four main parts: the generation of the private key, the generation of the public key, the signature and the verification. For each of them I have performed 10.000 tests and took the mean time and mean memory consumed.

As you can see, the key generation time and memory are not very different between the two algorithms, even if the Dilithium2 keys are much longer.
The test on signature and verification is done on different message lengths: 100, 500, 1000, 2.500, 5.000, 7.500 and 10.000 bytes. For each length, the test has always been performed 10.000 times.

Also in this case, the time and memory consumed by the two algorithms are really close to each other. In order to have a better view of the time consumed, you can have a look at the following graphs:
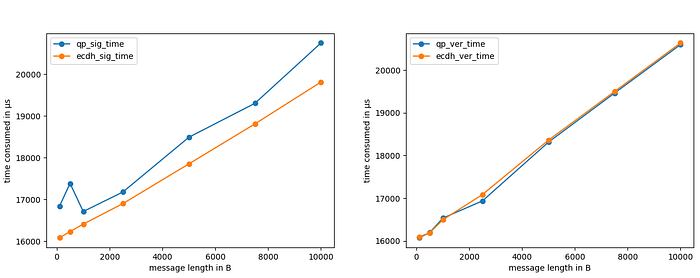
So, the only downside of the Dilithium2 signature scheme seems to be the length of the keys and of the signature!
Key Encapsulation Mechansim
The KEM algorithm is composed of four main parts: the generation of the private key, the generation of the public key, the encapsulation/encryption and the decryption. For each of them I have performed 10.000 tests and took the mean time and mean memory consumed.

In the above table, we can see that kyber512 is even faster than ECDH in the computation of private and public keys, while Stremlined NTRU Prime takes a lot more time to compute the private keys, but it is faster than Kyber512 in the generation of the public key.
Looking at the encapsulation part, ECDH simply encrypts a message so, in order to have a fair comparison, we encrpyted a 32 byte random string. This because the secret exchanged using Kyber512 or Stremlined NTRU Prime is composed of 32 bytes.

The results shows that, also in this case, Kyber512 is faster than ECDH, while Stremlined NTRU Prime is a little bit faster than ECDH in the encryption part, while it is slower in the decryption part.
Thus, also for these algorithms, we find that time consumption and memory usage are not an issue, with the private key generation of Streamlined NTRU Prime schemes being the exception.
Conclusion
Even if the theory behind Quantum-Proof cryptography is really complex and hard to understand: in practice, as you have seen, it is not difficult to use! Moreover, it is as fast as modern cryptographics and also the memory used is almost the same. So, what are you waiting for? Download Zenroom and start using quantum-proof cryptography to keep your data safe!

Credits:
Many thanks to the NLnet Foundation for believing in this project and supporting our work on quantum proof safety; as well to the Dyne.org team, especially Alberto Lerda, Denis ‘Jaromil’ Roio and Andrea D’Intino, for all their precious help and teamwork.
Tune in to the discussion 💬
(These services are bridged: join your favorite and reach them all)
🗨️ Matrix
🗨️ Telegram
🗨️ Discord
Support Dyne 🫱🏿🫲🏾
🪙 Bitcoins: bc1qz9wz2f9swcefra2tfrhk4fx49evqsv03m9nx4l
☕ Ko-Fi
🍴 Github.com
🧁 LiberaPay
🍥 Patreon.com
Follow Dyne.org 🗞️
Social Media everywhere!
🐘 Mastodon
🎬 Peertube
🐭 Lemmy
📸 Instagram
🐦 Xitter
👔 Linkedin
🪞 Facebook
✍️ Medium