
This post explains in brief how to create a secure and minimalist Bitcoin wallet that stores all keys off-line (cold storage) and is in your complete control: the private key will never be known to any software connected to the network. This setup does not enforce strong privacy for your transactions, but is useful to prove the origin of Bitcoin transactions.
We rely on the use of small and powerful software:
Zenroom can be used off-line to generate a “master key” and a public address. This software is smaller than 2MB that has zero external dependencies: it is designed without capabilities to connect to the network or write to a disk.
Following this tutorial the master key of our wallet will never be exposed to the network: Zenroom is the only application asking this key and it forgets it when it quits.
Also interesting to know for the developers reading is that Zenroom can be easily embedded in your own application: everything you are learning here can be done using library calls passing it Zencode and JSON just like in the examples below. Bindings exist for Android, Apple/iOS and various languages like Javascript (also React-Native) as well Go, Rust and Python.
Now let’s get started! if you are doing this for real, make sure no-one is looking above your shoulder, since your keys will appear on the screen.

Setup your working environment
This tutorial assumes the use of a Secure off-line PC that is used to generate the wallet key and store it when needed to sign new transactions. It is recommended to perform network operations on any on-line PC and move downloads to it by means of a USB-key.
First one should download the Zenroom command-line application from Zenroom.org: any platform is supported, typically you will want a MS/Windows or Apple/OSX or GNU/Linux binary; don’t worry about dependencies, library frameworks or DLLs since nothing else is needed, just one of these tiny binaries found on files.dyne.org/zenroom/releases/v2/. You can also preserve them in a safe place and be reassured they will still work in future: Zenroom is a zero-dependency C99 software released as free and open source by the Dyne.org foundation on https://github.com/dyne/zenroom.
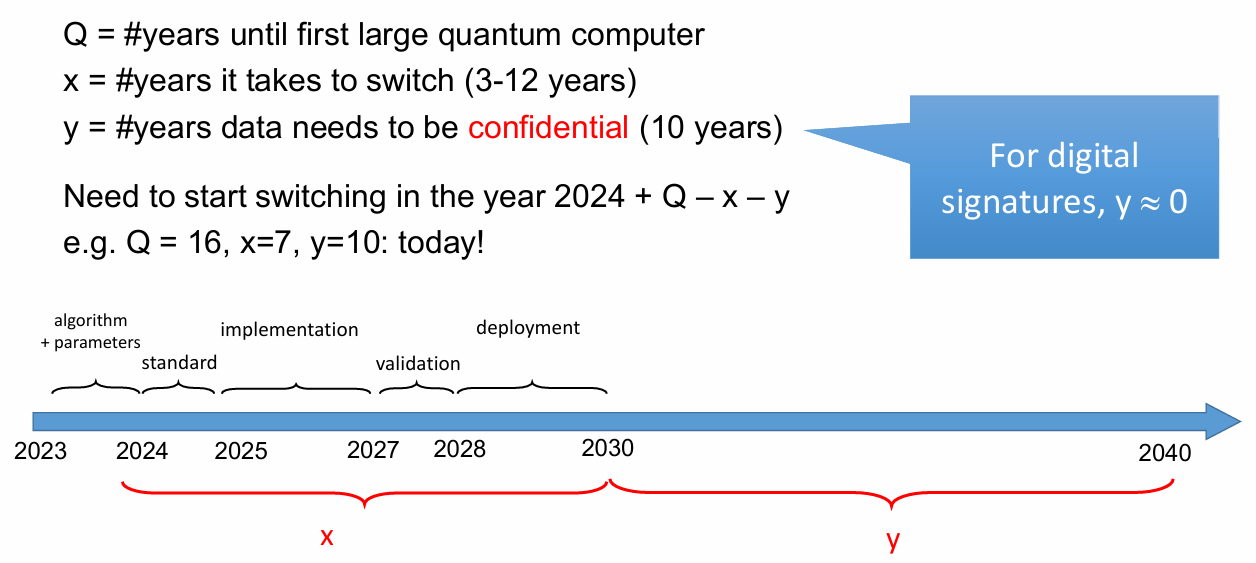
To have a future proof setup is very important: always ask yourself if the wallet application you are using will be able to store Bitcoins for the next 20 years and still work.
Once you are able to execute the Zenroom application from a terminal, the only thing you need is a text editor: your favorite will do, even notepad.exe. The few on-line operations performed will be done manually, cutting and pasting data from the terminal to a browser.
The following Zencode examples use the word testnet, to use it on the main network one needs to substitute that with the word bitcoin.
To get straight away to a shell script example of this tutorial, please refer to bitcoin_offline_wallet.sh in Zenroom’s repository.
Generate your secret key
Key generation can be performed entirely off-line: create a plain-text file and call it something like keygen.txt and paste the following Zencode into it, including carriage returns (newlines):
Given nothing
When I create the testnet key
Then print the ‘keys’
Then execute this with the command: ./zenroom -z keygen.txt
You will see a sequences of characters and numbers appear on your screen:
{“keys”: { “testnet”: “cMqN1QyWYZqAAw5qVH8AzFF3GVM9VQKyNEY7ZUQsPivVpVYWjzfx”
} }
This is the master key of your new wallet, store it safely!
Do not save it on your desktop nor write it down in an visible place: anyone knowing this secret can steal your funds.
This key is in WIF format and base58 encoded, it is compatible with any Bitcoin wallet, for instance it can be imported inside Electrum using the prefix ‘p2wpkh:’. Just take what is inside the brackets and quotes, without the first 2 words “keys” and “testnet” (or “bitcoin” if you are not running a test) and use:p2wpkh:cMqN1QyWYZqAAw5qVH8AzFF3GVM9VQKyNEY7ZUQsPivVpVYWjzfx
Generate your public address
Once you have a secret key you can use it to generate your main public address to receive funds. Having the result of the previous operation saved to a file, for instancekeys.txt then create a new Zencode file pubgen.txt:
Given I have the ‘keys’
When I create the testnet address
Then print the ‘testnet address’
Then run the command: ./zenroom -z pubgen.txt -k keys.txt
This command will output your public address that you can give away to receive funds:
{ “testnet_address”: “tb1qc5wzp53l39v499nvycmcvu2aaqlu84xnkhq3dv” }This is your public address (in Segwit compliant format bech32 aka BIP0173 which will also save you mining fees) and you can publish it to receive bitcoins. Any bitcoin received on this address will be visible using public blockchain explorers and easy to trace! this may be an advantage if you are declaring your operations to authorities.
Receiving bitcoins is now easy: just give away this address. Also checking your balance is easy: any blockchain explorer can be used, here for instance you see the current balance of the testnet address in this example.
Make a transaction to send bitcoins
Sending bitcoins requires a bit more attention especially because we want to make our procedure super-secure by signing transactions off-line. We need to make sure that our master key is never exposed to any software connected to the network. This is the only truly trust-less approach, in any other we have to trust the software developers.
For this operation we will have 2 different personal computers (PC) both installed with Zenroom:
- The Secure off-line PC should have no network connection at all
- The Public on-line PC should have network and a web browser
This setup requires some manual operations to be performed with:
- a USB-key to copy data between Secure and Public (format it once done!)
- (optional) a mouse to do copy and paste operations in the browser
And of course we need an address that has received at least some Bitcoins, else we cannot send anything! the one in this tutorial is a testnet address we loaded using online “faucets” giving away free testnet coins.
Here a diagram explaining the operations we will need to perform:
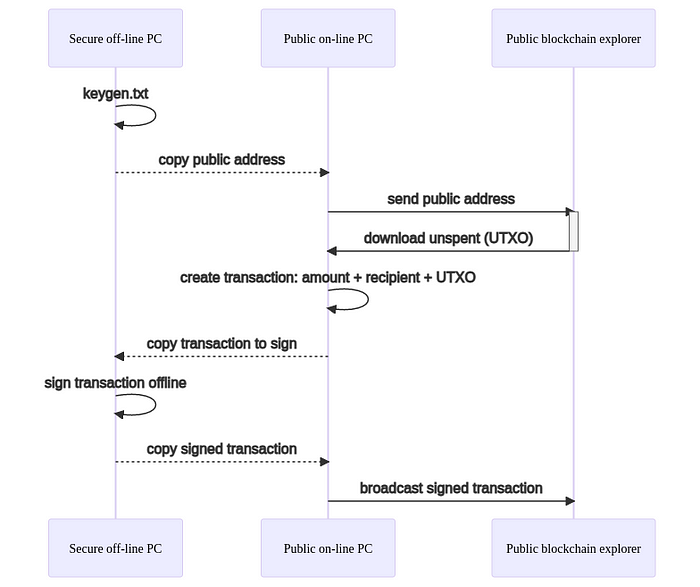
We have seen how to generate a secret key and know its public address: these operations should all be done on the Secure PC. Then to complete the first 2 steps we will copy the public address to the Public PC using a USB-key.
From the Public PC we will open the browser and download the “unspent transactions” using this URL:https://blockstream.info/testnet/api/address/.../utxo
Substituting the dots (…) with our public address, for our example this is:
https://blockstream.info/testnet/api/address/tb1qc5wzp53l39v499nvycmcvu2aaqlu84xnkhq3dv/utxo
This will give us a longer text (JSON format) that we need to copy and paste into a new file, for instance save it inside a file called UTXO.txt
Then we need to create a file defining our transaction order: its recipient, amount and the mining fee we intend to pay. Let’s call it order.txt and write our will inside:
{ “satoshi amount”: “1”,
“satoshi fee”: “141”,
“recipient”: “tb1q73czlxl7us4s6num5sjlnq6r0yuf8uh5clr2tm”,
“sender”: “tb1qc5wzp53l39v499nvycmcvu2aaqlu84xnkhq3dv”,
}
Here we are sending one Satoshi (0.00000001 BTC) to a recipient address: we specify our sender address(the one in this example) and pay a mining fee of 141 Satoshi (minimum needed for good testnet speed at the time of writing).
Then on the next line of this file we should paste the UTXO.txt contents inside a “satoshi unspent”: … } last element, in place of the … three dots.

At this point we create the Zencode that will combine the order with the UTXO information we retrieved online, let’s call it maketx.txt and write:
Given I have a ‘testnet address’ named ‘sender’
and I have a ‘testnet address’ named ‘recipient’
and a ‘satoshi fee’
and a ‘satoshi amount’
and a ‘satoshi unspent’
When I rename ‘satoshi unspent’ to ‘testnet unspent’
and I create the testnet transaction
Then print the ‘testnet transaction’
Then execute this with ./zenroom -z maketx.txt -a order.txt and collect the output into a file we will call transaction.txt which is ready to be signed.
Now we move transaction.txt to the USB-key and copy it to the Secure off-line PC, in the same folder where we have our keys and the Zenroom executable.
Sign the transaction
We are now on the Secure off-line PC and we have all what is needed to sign a transaction. Let’s create the Zencode file sign.txt inside the same folder we have Zenroom, our keys.txt and the transaction.txt and write into it:
Given I have the ‘keys’
and I have a ‘base64 dictionary’ named ‘testnet transaction’
When I sign the testnet transaction
and I create the testnet raw transaction
Then print the ‘testnet raw transaction’ as ‘hex’
Then execute it with ./zenroom -z sign.txt -k keys.txt -a transaction.txt
The output of this command will be an hexadecimal sequence consisting in the Bitcoin Raw Transaction (RAWTX) that we have signed and therefore ready to be sent. The last thing we need to do is inform everyone that we have transferred that amount from our wallet to the recipient: until the RAWTX is sent on-line the amount is not spent.
Therefore the last thing we need to do is copy this output to a new file, for instance rawtx.txt and transfer it to the Public on-line PC via USB-key, then we can send it using a blockchain explorer like the one on https://blockstream.info/testnet/tx/push where we can just paste the RAWTX and push the “Broadcast transaction” button. Soon enough our transaction will be visible to everyone in Bitcoin and will start being validated, the link to this new transaction is usually returned by the blockchain explorer.
In case you are doing a real transaction then the correct address to send is https://blockstream.info/tx/push there may be more online services doing this as well wallets like Electrum and Bitcoin Core can be used.
Caveats
There are a few things to keep in mind when using this wallet method:
- Every time the secret.txt file is written on a disk it may leave traces of your master key passphrase, even after deletion. It is recommendable to use a secure delete program like
wipeon Linux orSDeleteon Windows to remove it once done. - After use the USB-key needs to be fully formatted and files on it deleted securely.
- The address this wallet produces can be reused for different transactions and is therefore easier to track: this setup is not really good at hiding the amounts one sends and receives with it.
Credits
Many thanks to Alberto Lerda for contributing the Bitcoin crypto primitives implementation inside Zenroom and to Andrea D’Intino for his coaching.
Also kudos to the Orange Pill community and of course Max & Stacy for motivating the making of this tutorial ❤
If you need help to manage or develop your wallets: we have solutions!
You are welcome to contact us at the Forkbomb company.
Tune in to the discussion 💬
(These services are bridged: join your favorite and reach them all)
🗨️ Matrix
🗨️ Telegram
🗨️ Discord
Support Dyne 🫱🏿🫲🏾
🪙 Bitcoins: bc1qz9wz2f9swcefra2tfrhk4fx49evqsv03m9nx4l
☕ Ko-Fi
🍴 Github.com
🧁 LiberaPay
🍥 Patreon.com
Follow Dyne.org 🗞️
Social Media everywhere!
🐘 Mastodon
🎬 Peertube
🐭 Lemmy
📸 Instagram
🐦 Xitter
👔 Linkedin
🪞 Facebook
✍️ Medium